Caribbean · Comfort Food · Pasta · Pies · Side Dishes · Vegetarian

Mac’n’Cheese Pie

Now, here is a family favourite that never gets old! It is meant to be eaten as a side dish with your meat and hard food, but in this house it is just as often eaten as a main course with a nice salad on the side.

It does take a bit of time to prepare and cook the Mac’n’Cheese Pie, but 45 minutes of the total time is the baking of the dish in the oven. And to be fair, everything can be prepared in advance so that all you need is to bake it off when it’s time to eat. Alternatively, you can pre-bake it and just heat it up before serving. Best of all – you can even make a big batch and put a few portions in the freezer for quick lunches or a day when there’s just no time to cook.

Please note, this recipe is listed as vegetarian, but it does have dairy products and eggs in it. If this is a no go for you, skip the eggs and substitute the dairy with dairy free alternatives.

This recipe makes 8 portions of Mac’n’Cheese.

Ingredients:

  • 1 litre (10dl) dried short cut macaroni
  • 6 tbsp butter, plus a little extra for greasing
  • 6 tbsp white flour
  • 1 litre (10dl)  milk
  • 2 dl cream
  • 1 tbsp mild mustard
  • (1 teaspoon ground cinnamon)
  • 5+7dl cheese, grated
  • 2 eggs, beaten
  • 1 dl scallions (or onion), finely chopped
  • 1 dl peas (optional)
  • 1 dl chopped plum tomatoes (canned or fresh)
  • 2 dl sliced yellow and/or red peppers
  • 2 dl sweet corn
  • salt
  • pepper
  • seasoning of your choice
  • (fresh parsley, chopped (to garnish)

Directions:

  1. Preheat the oven to 180C.
  2. Boil the macaroni for 8 minutes in lightly salted water (it should be al dente but not crunchy inside) Rinse under cold water and drain.
  3. Melt 4 tbsp butter in a pan and stir in the flour. Add the cream and cook for 1-2 minutes, stirring vigorously. Then gradually add the milk and keep whisking until the sauce boils and thickens.
  4. Stir in mustard, (cinnamon), salt and pepper to taste, and half the cheese, then remove from the heat. Keep stirring until the cheese has melted, then add the beaten eggs and fold them into the mixture until you have a smooth, well mixed thick sauce. Pour the sauce over the macaroni and fold together.
  5. Melt 2 tbsp butter in the frying pan and cook the vegetables on low to medium heat for 5-10 minutes. If you are using peas, add them after the rest of the veg have been cooked, then season the mixed veg to taste with salt, pepper and your favourite seasoning.
  6. Pour half of the mac’n’cheese into a greased ovenproof dish. Spread the veggie mix evenly over the base layer, and top with second layer of the remaining mac’n’cheese.
  7. Sprinkle the rest of the cheese all over the top layer and bake in the oven for 45 minutes, or until the top is golden and bubbling.
  8. Sprinkle with fresh chopped parsley before serving (optional)

Serve as a side dish with your Sunday roast, or as a vegetarian main course with a seasonal salad.


Baking · Comfort Food · Desserts & Puddings · Swedish

Kladdkaka or Swedish Sticky Chocolate Cake

This cake is so easy to make that even the kids can be allowed to have a go. It was my birthday yesterday and my youngest daughter who we don’t normally let loose in the kitchen made this for our evening coffee. Simply divine!

Kladdkaka, a sticky chocolate cake, is a traditional Swedish fika (our word for the daily coffee/tea breaks we enjoy and love to share with friends and family) favourite. Almost impossible to ruin (unless you leave it in the oven for too long) and very quick and easy to make. It doesn’t even take very long to clean up after.

The cake is delicious served warm with ice cream, whipped (or even clotted) cream, but can also be served cold just as it is. When you have surprise visitors popping in, you can pop a cake in the oven and be ready to serve it just over half an hour later. How cool is that! =)

Ingredients:

  • 100 g butter
  • 2 1/2 dl (1 UK cup) caster sugar
  • 2 eggs
  • 1 1/2 dl (0.6 UK cup) plain flour
  • 3 tbsp cocoa
  • 1 tsp vanilla sugar
  • icing sugar to decorate

Directions:

  1. Turn the oven on at 175° Celcius (350 F/gas mark 4).
  2. Melt the butter in a saucepan.
  3. Take the saucepan off the hob and stir in the sugar and the eggs.
  4. Add all other ingredients (apart from the icing sugar) and mix to a nice smooth “gooey” consistency.
  5. Pour the mixture into a breaded or papered oven tray.
  6. Bake in the middle of the oven for approximately 20 minutes

You should end up with a fairly low cake that has a slightly crispy crust and a sticky inside. Once it has cooled down a little you can sprinkle some icing sugar over it and serve with cream, ice cream and/or berries and/or fruit. Or whatever else you might like to serve with a chocolatey sticky cake, really. I promise it’ll be a hit! =)

Caribbean · Chicken

Scandiribbean BBQ Beer Batty Chicken

For those of you who don’t speak much patois, maybe I should first of all explain that batty is the patois word for your backside. The name of the dish comes from the fact that the chicken gets a beer can stuffed up its batty and is thus steamed and roasted at the same time.

This is an absolutely gorgeous dish that you just have to try! As the chicken gets steamed and roasted at the same time, the meat comes out juicy and succulent in a way you hardly knew chicken could be. It’s also great because you can play around with the ingredients and choose your favourites or make it slightly different every time you cook it.

Best of all – it takes very little time to make!

Ingridients:

  • a whole chicken
  • seasoning of your choice
  • a can of guinness (or any other beer really)
  • a few cloves of garlic
  • escallion
  • salt & pepper
  • chillies or pepper sauce
  • olive oil

Directions:

  1. Prepare and season the chicken the way you like it best. Don’t forget to rub seasoning under the skin. Leave the chicken to season for as long as you like – we would normally let it soak in a mix of grated onion, herbs and chillies or scotch bonnet pepper for up to three days. Or more if John gets his way.
  2. When it’s time to cook, start by preheating your oven to 240°C/475°F/gas 9 or getting the BBQ started
  3. Open the top of the beer can with a can opener and pour just over 1/3 of the beer into a glass. This you can either drink whilst cooking or pour into the rice or hard food or whatever you are cooking for a side.
  4. Put salt, pepper, chillies, garlic cloves, escallion and herbs (or whatever mixture of flavours you would prefer) into the can
  5. Gently lower the chicken over the can, so that it sits firmly on the beer can
  6. Pour the remaining seasoning from the bowl the chicken was in into a cup and add some olive oil
  7. Brush some oily seasoning over the chicken
  8. Put chicken in the oven and turn the heat down to 200°C/400°F/gas 6 and cook the chicken for about an hour and a half. Brush some more oily seasoning mixture over it ever half hour. If you’re using the BBQ put it on top of a small oven tray to keep it from toppling over, put the lid down and follow the same procedure as for the oven.

When the chicken is done, cut it into nice pieces and serve with savoury rice, rice & peas, roast potatoes, hard food or whatever tickles your taste buds. I can promise that you’re in for a treat!

Uncategorized

50.000 visitors can’t be wrong…

Amazingly, we have just had our 50.000 visitor here in my kitchen and over the weekend we celebrated the occasion by giving the site a long overdue, and well deserved, redecoration. We hope you guys will like it just as much as we do.

Evalena’s Scandiribbean Kitchen started in May 2008 as a desperate attempt to find a way of storing my recipes so that I would always know where to find them. And to clear up some space in my shoe box size flat. Within a week, the blog had been visited by over a 100 people, and I couldn’t believe my eyes when every time I logged on the statistics had gone up even more.

John and I are passionate about food. We love to eat it, cook it, talk about it and share our passion with other people, but we never imagined a blog about our food would be this popular. We would like to say our humblest thanks to each and every one of you and we promise we’ll try to add new recipes and information about special ingredients more often. As a special treat, we will also be launching our Scandiribbean food shop soon!

Happy cooking and bon appetit!

Caribbean · Chicken · Comfort Food · Slow Cooking

Scandiribbean Stew Chicken

Everybody in this house agrees that stews are fabulous food, but we have very different ideas of what makes a stew. I love beans and lentils, the kids want potatoes, carrots and stuff, and John is not convinced that either “peas” or root veggies are the bees knees. The kids don’t want meat on the bone, whereas John and I prefer it that way. I’m telling you, Scandiribbean fusion food can be a very tricky cuisine to master to everyone’s liking.

Yesterday, I made a version of stew chicken that combined Swedish style with West Indian taste. The good thing about this one is that everybody gets something they like. As usual, I cooked for a battalion and without any real measurements, but here’s a rough guide:

Ingredients:

  • 4 onions
  • 4-6 cloves of garlic
  • 4 carrots
  • 4 baking potatoes, or 8 “normal” ones
  • 1 swede (the vegetable!)
  • 4 turnips
  • tomato puree
  • 12 tomatoes (or 2 tins of tomatoes)
  • 1 scotch bonnet (or other chillies or pepper sauce)
  • fresh ginger
  • bay leaves
  • lemon juice
  • soy sauce
  • maggi sauce
  • 1 pint of guinness
  • 1,5 litre chicken stock
  • salt & black pepper to taste
  • olive oil
  • molasses or brown sugar
  • raw chicken on the bone cut in small pieces
  • meat of a cooked boiler hen (optional)

Directions:

  1. Season the raw chicken in a mix of soy sauce, maggi seasoning, lemon juice and salt/pepper/chilli for a day (shorter if you must)
  2. Chop the oinions and the garlic
  3. Peel the ginger and cut in a couple of big bits (so it’s easy to spot them and take them out later)
  4. Peel and chop all veggies into large cubes
  5. Heat up olive oil and molasses or brown sugar and stir until the sugar has melted.
  6. Add the chicken and stir vigorously until it has a nice brown colour
  7. In a Dutch put or slow cooker or big stew pot, heat up olive oil and add onions, garlic and scotch bonnet (or pepper sauce). Go gentle on the chilli – this dish is not meant to be hot it should just have a gentle warmth to it.
  8. When the onion is soft, add all the vegetables, the ginger, chicken stock, guinness, tomatoes and tomato puree and bring to the boil.
  9. Turn the heat down until you have a nice simmer, and add the chicken bits.
  10. Allow to simmer for about 40 minutes (if it looks to “watery” take the lid off and allow it to reduce for another 20 while you cook the rice)
  11. To please people who are scared of meat on the bone, you can now either add precooked meat to the stew, or fish some of the stew (without the bone chicken bits) out to another pot together with the boneless chicken.
  12. Check the taste and add salt/pepper/chilli/lemon juice/chicken stock/tomato puree/guinness or whatever you feel you’d like some more of. Ideally, the taste should be slightly different each time you make a stew. Chopped cilantro and /0r a few sprigs of thyme is nice.

Serve with rice, rice & peas, some fresh bread, with a salad or eat just as it is. Any way that works for you is good! =)

You can put the stew in the freezer and save it for a rainy day, or one of those when you don’t feel like cooking but still want a nice home cooked meal.

Bon appetit!

Comfort Food · Food for a Fiver · Soup

West Indian Pumpkin Soup

Pumpkin soup, I must admit, is not exactly one of them dishes that are especially photogenique. But if you are looking for a warming, comfort food type, meal with a lovely velvety texture and a rich taste with a little retrospective sting to it, you’ve got to try this.

Ingredients:

  • 2 onions
  • 4-6 cloves of garlic
  • 2 carrots
  • 4 stalks of celery
  • 1 scotch bonnet (use pepper sauce or other chillies if you can’t find scotch bonnets)
  • 1 calabaza or butternut squash
  • 2 large baking potatoes or sweet potatoes
  • 1/2 a cup cilantro or parsley
  • 4 bay leaves
  • a few sprigs of fresh thyme or 2 tspn dried thyme leaves
  • 2 tbsp brown sugar
  • salt & freshly ground black pepper
  • olive oil
  • chicken or chicken feet (optional)

Directions:

  1. Chop up all the vegetables in large cubes
  2. Finely chop the scotch bonnet and the herbs (but not the bay leaves and the thyme sprigs)
  3. Heat the oil in a Dutch pot or a big soup pot.
  4. Add the onions, garlic and scotch bonnet and stir until the onion is soft
  5. Add the rest of the vegetables, the herbs, the bay leaves and thyme sprigs together with the chicken stock.
  6. Add salt and black pepper to taste.
  7. Allow to simmer for about half an hour until all vegetables are soft.
  8. Remove bay leaves and thyme twigs
  9. Puree the soup in a blender or food processor. (I like the hand held ones you can use in the pot as it saves you doing a lot of extra washing up…)
  10. Serve with fresh bread and enjoy! =)

Personally, I like to have chicken in this soup, whereas the Man wants chicken feet in it. None of them is necessary, but add to the taste. When you make the broth, or stock if you like, (because let’s face it – the cubed versions are nowhere near as nice as the home made stuff) you can use a boiler hen and add chicken feet at the end (last half hour or so) of the boiling process and save the meat and the feet to add to the soup after it has been pureed.

I would also like to add that I like to add some maggi seasoning and a bit of guinness to my soup, but again both are optional. Some people also like to add some cream or to put a dollop of sour cream on top of the soup.

The soup can be kept in the freezer, but you will need to add some extra water when you heat it. It won’t have the same velvety texture, but it will still have the same lovely taste.

Baking · Bread

Thyme & Tomato Bread

A nice hearty soup needs a nice freshly baked bread to go with it. Or at least that’s what I think. Today, I’ve been making enough soup and stew to feed the family and the whole neighbourhood. (I feel rich when I have food in my kitchen… =)) Looking at the lovely pumpkin soup I’d made, I  felt it would be a shame not to have a proper good bread to serve with it.

Thyme & Tomato bread (pic does not do the colour justice)

I looked through my cupboards and found some tinned chopped tomatoes and I harvested some thyme from our little herb garden. I chopped the thyme and mixed it with the tomatoes, 2dl olive oil, a bit of salt and a cup of hot water. Then I stirred 75g of fresh yeast (can be bought in Polish shops) into this mixture and made sure it was properly dissolved.

With the wet mixture ready to go, I added a handful each of pumpkin and sunflower seeds and another handful of oats. Then I worked roughly 1,5kg of white flour into the mix until I had a nice moist dough that did not stick to my hands. I covered the bowl and allow the dough to rest for half an hour.

The dough now doubled in size was again worked together and cut up in three bits. One I turned into little rolls, and two into bigger flat breads. Again, I allowed them to rest for another half hour before baking in the oven at 250 degrees. 7-8 minutes for the rolls and 12-15 for the breads.

Last, but not least, we had newly baked rolls with real butter and a gorgeous bowl of pumpkin soup – all at a bargain cost of less than £5. What a feast!

Ingredients

Cilantro, or Coriander

Cilantro, or coriander as we call it here in Europe, is a herb or a spice depending on what part of the plant we’re talking about.

Sometimes referred to as Mexican or Chinese parsley, the Cilantro is native to south west Asia and west to north Africa. It is a soft, hairless plant growing to 50 cm [that’s 20 inches in case you don’t get the metric system] tall. The leaves vary in shape, and are normally broadly lobed at the base of the plant, and slender and feathery higher on the flowering stems. The flowers sit in small clusters (which I just have learned are called umbels) and they are white or very pale pink, asymmetrical and with petals that point away from the centre of the umbel being longer than those pointing to the middle of the umbel. (Good to know! lol) The fruit is a globular dry schizocarp (another new word for me!) and 3-5 mm diameter.

We use cilantro leaves as a herb in salads, seasonings, stews and cold sauces. The fruit is dried and used in sweets, curries, breads, cakes and liqueurs; the flowers can be used as edible garnish and even the roots can be eaten stir fried or julienned or chucked in stews.

Cilantro is also believed to have some medicinal properties:

  • It is considered an aid to the digestive system. It is an appetite stimulant and aids in the secretion of gastric juices.
  • A poultice of Coriander seed can be applied externally to relieve painful joints and rheumatism.
  • The essential oils of the Cilantro leaves contain antibacterial properties and can be used as a fungicide.
  • The seeds are considered to have cholesterol-lowering properties.
  • It has pain-relieving properties and is useful for headaches, muscle pain, stiffness and arthritis.
  • It is useful as a tea, because of its helpful effects on the digestive tract, and is good for increasing appetite, and relieving nausea, diarrhea, flatulence and indigestion.
  • It is reputed to enhance circulation and relieve fluid retention.
Baking · Comfort Food · Desserts & Puddings · Sweets

Chocolate Fudge Cake

Fudge_Cake

This is an absolutely gorgeous chocolate fudge cake for one of those days when you just neeeeeed a choccie overload… =) Chocolate sponge sandwiched with chocolate and topped with even more chocolate! Yum scrumm for all us chocoholics out there…

Ingredients:

  • 100g spreadable butter
  • 250ml milk
  • 1 tbsp red vinegar
  • 100g plain chocolate, melted
  • 15g cocoa powder
  • 300g self-raising flour
  • 1 tsp bicarbonate soda
  • 225g golden caster sugar
  • 2 eggs
  • Icing: 225g plain chocolate, 100g butter and 142ml carton double cream

Directions:

  1. Preheat the oven to 180 degrees C
  2. Grease a round deep cake tin and line with baking paper
  3. Mix milk and vinegar
  4. Place all other cake ingredients in a large mixing bowl
  5. Pour in the milk mixture and whisk until smooth
  6. Spread into the baking tin and bake for an hour until firm in the centre
  7. Cool for 10mins, then turn out on a rack to cool completely
  8. Meanwhile, make the icing by melting the chocolate and butter together in the microwave for 3 minutes on medium heat, stirring after 90s. Stir until smooth then beat in the cream. Cool slightly.
  9. Halve the cake through the middle and spread half of the icing on the bottom half and sandwich together.
  10. Spread the rest of the icing over the top and sides of the cake
  11. If you want to, you can sift a little icing sugar over the cake and decorate with strawberries or something.
Atkins/Low Carb · Baking · Bread · Swedish

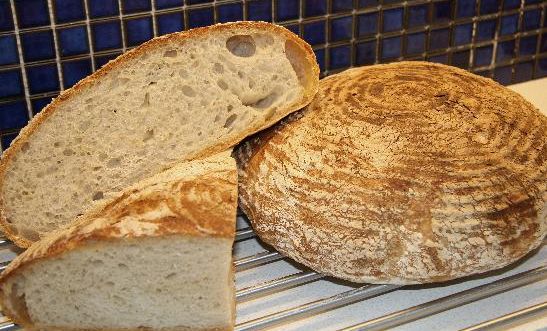
Sour Dough Bread or Swedish Surdegsbröd

sour-dough-bread

Sour dough bread is a very healthy, and very tasty, bread that is quite common in Sweden. It is very easy to make, but it does take its time to make. Once its baked you have a tasty bread that stays fresh for up to a week. At least. Save a piece of the sour dough in an air tight box or jar and you’ll have the base ready for next time.

Sour dough:

  • 4 tbsp rye flour
  • 2dl finger warm water
  • Mix flour and water and leave to rest in an air tight jar or box for at least 48 hrs. Do not put it in the fridge – it has to be warm!
  • After 2 days, add another 2 tbsp of rye flour and leave to rest for another 24 hrs.

Directions:

  1. DAY 1 – In the evening, take your sour dough and mix it with 3dl finger warm water and 200g rye flour. Leave to rest over night.
  2. DAY 2 – In the morning, take away 1dl of sour dough, put in an air tight jar och box and put in the fride for next time. Add 3dl finger warm water and 200g rye flour to your dough and leave to rest for 5-10 hrs.
  3. DAY 2 – In the evening, add 5dl finger warm water, 1 tbsp salt, 2dl flour and 500g rye flour. Leave to rest for an hour.
  4. Cut the dough in four and mould into loaves.
  5. Put the loaves in greased or papered baking trays and sprinkle them with a little flour.
  6. Leave to rest for about 40 mins until you can see little holes emerging in the dough.
  7. Set the oven to 250 degrees C.
  8. Put the loaves in the oven and reduce the temperature to 200 degrees.
  9. After 40 minutes, reduce the temperature to 180 degrees and leave the breads in for another 10-20 minutes.
  10. Take the loaves out and let them cool.

You can freeze the bread, but it stays fresh for a long time, so unless you’re a small household or nor very hard on the bread you can keep it wrapped in a plastic bag for at least a week.